A Face Mask You Can Drink Through (and Buy From Me)
I saw this Facebook post and thought it looked like a really good idea, as well as being funny and delightful. Could we actually produce and sell these?
The first problem is that, as funny and delightful as it is, this mask is obviously not OK as an actual mask. Unless there’s something you can’t see under the flap, the Velcro will not form a tight enough seal over the hole when the flap is closed to prevent an unacceptable amount of air flow. I know, because I tried it.

I thought maybe if there were a rubber disk on the flap, the velcro could press it down over the grommet hole. But every version I tried did not work, because the velcro was not able to hold the rubber flatly and firmly enough over the grommet. And fastening a rubber disk to fabric or Velcro is tricky.
After rejecting several alternatives, I came up with what I think is a good solution (see below), which we can make reasonably efficiently. So now we have this commercially available drinking-straw-compatible face mask! For sale now!
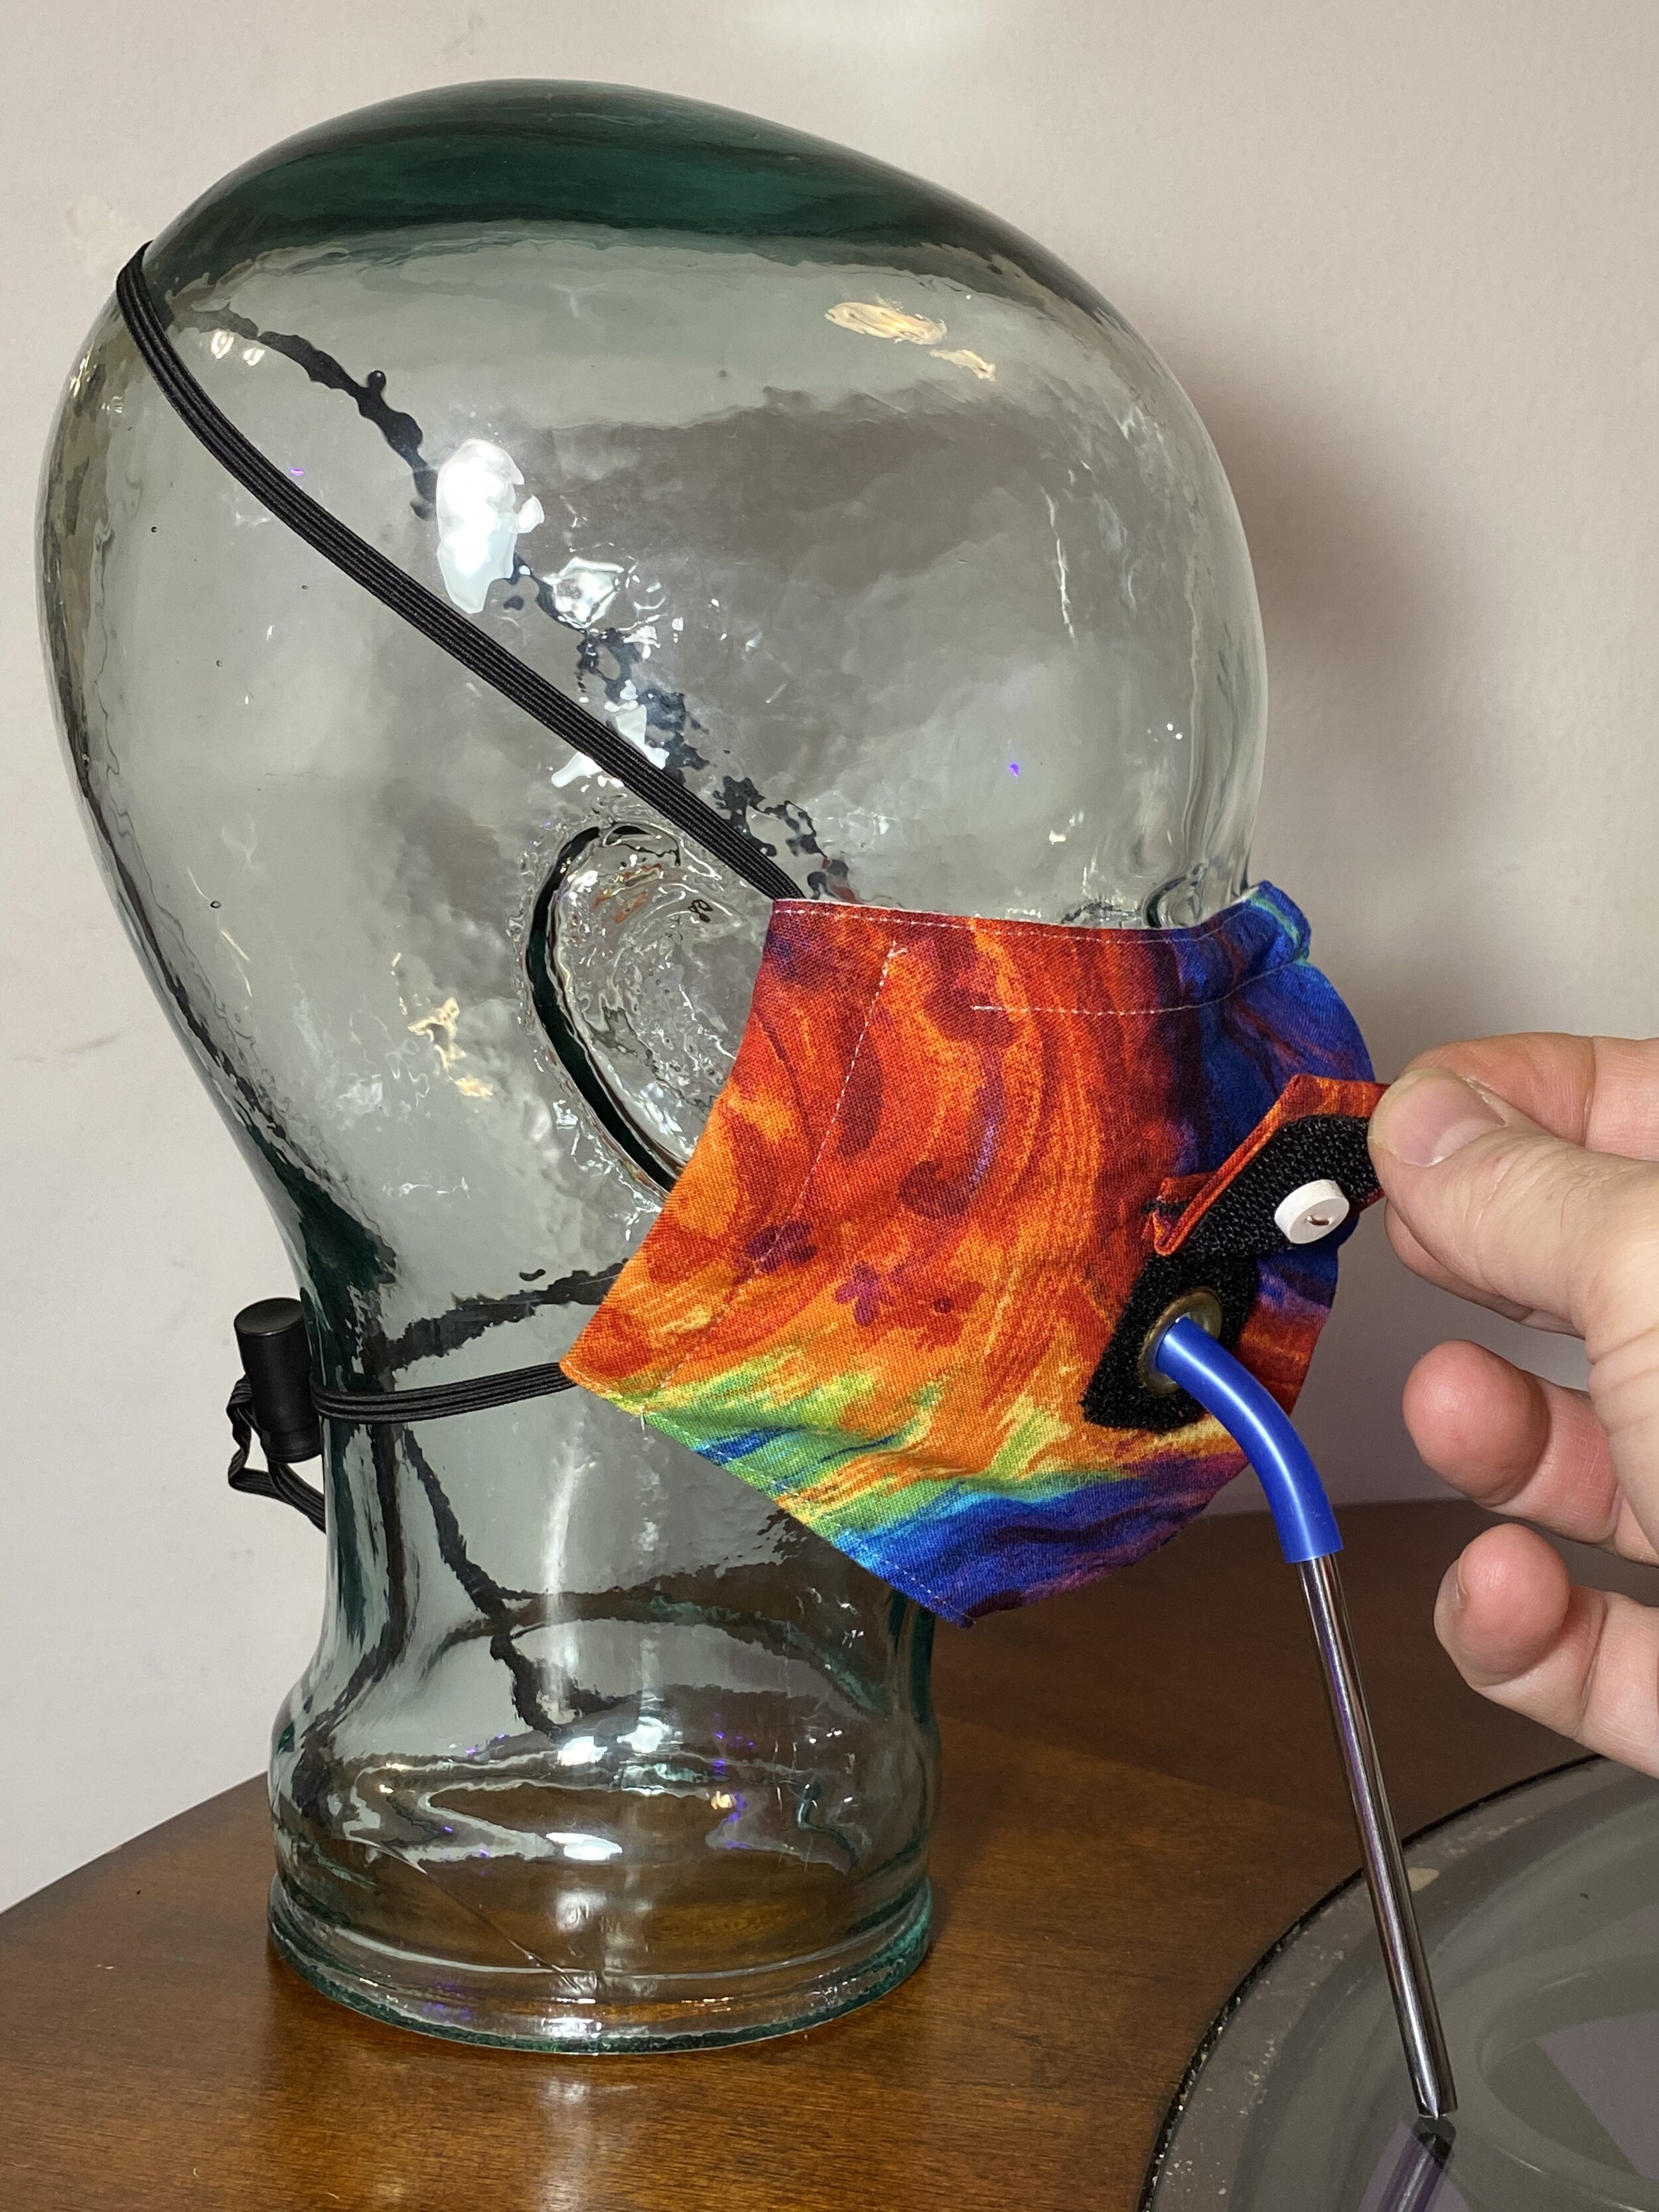
(Yes, I had to cut the straw off on both ends to take this picture, because my glass head doesn’t have a mouth hole, and neither does my table.)

Update: I finally got a picture of Maribel wearing one of the masks! Although you can’t see it in the picture, she does have a hole in her head where the straw goes, so I didn’t have to cut this one off.
As you can see, she’s wearing a coordinated cap, which is apparently now the fashion in her home town of Santiago, Panama. The cap is to protect your hair from contamination so you don’t have to wash it immediately on returning from the store—important if you’re a girl with a fancy hairdo. (We are not currently offering matched sets of masks and caps, but you never know.)
My solution to the air leaking problem is a laser-cut plug of food-grade silicone rubber, fastened to the Velcro with a loop of copper wire. When you close the flap, the plug (which is very slightly tapered by the cutting process) fits neatly into the grommet hole, sealing it off. The laser cutting is precise enough that we can make the plug just big enough to close the hole, but not so big that it’s hard to push in or pull out. The wire loop intentionally does not hold the plug tightly up against the Velcro: the plug is able to move slightly side to side, just a bit, so it can automatically center itself in the hole as you close the flap.
As usual, this stupidly simple solution took way longer than it should have to come up with, since every other alternative had to be explored and rejected first.
Below are some details on the construction of the flap, but if you just want to cut to the chase, yes, we really are selling these, right now. First ones should go out the door within a few days, and they come with a complimentary stainless steel reusable straw. You can add the flap as an option to any of the fabric choices we have available.
Now all you need is a situation to use it in! Maybe you’re in a gym or park and have a water bottle with a straw? Or you’re at a socially distant social event at which champagne is to be consumed—but how? So many possibilities!
Aside from making a proper air-tight seal, the main issue with a flap like this is going to be durability. Will it come undone if you use it a lot? As you can see from this closeup, I’ve tried to address this with a lot fabric and stitching. The fabric is folded to form four layers everywhere, and six along the top where it’s fastened to the mask. The top line is stitched twice with tightly-spaced zig-zag stitches, extending past the edge.
(The square of stitching is holding down the edge of the velcro on the other side. Probably should use a thread color more closely matched to the fabric.)
Open up the flap and you can see the silicone plug and the wire holding it in place. This wire goes through the plug and through the velcro, then the two ends bend flat between the velcro and the fabric. It’s sturdy, and the silicone is tough, so I don’t think it will come off any time soon. I considered pop-rivets and sewing, but neither worked as well as the wire.
Why copper? Well, it does have anti-microbial properties, but saying that would just be marketing drivel: the real reason is because it doesn’t rust, and it’s easy to work with. And it’s the same wire we use for nose wires.
Notice how both pieces of Velcro are zig-zag stitched all around, so they will not come off. They are actually also self-adhesive, but that’s just a convenience to hold them in place while sewing.
From the back side you can see how neatly the plug fits into the grommet hole. You can also see how not-neatly I stitched the flap. We’ll get better at it, promise—this was only the third mask I added a flap to.
Notice the one missed stitch about 2/3 of the way up on the left side. See the end of this post for a discussion of the unusual nature of the sewing machine I used to do this, and why it should, but obviously didn’t, prevent that from happening.
(By the way, this grommet looks corroded because it’s a cheap brass-plated steel grommet I used for the prototype. The masks we sell will use the solid brass marine-grade grommets arriving today.)
The plug is made of 1/8” (3mm) thick food-grade silicone rubber sheeting, which I happen to have a square of (enough for thousands of plugs) thanks to a test I did for a local design and prototyping company. They wanted to see if it was possible to laser cut this material (yes), and if the resulting gasket would work for their project (don’t know, but they left me the rest of the silicone sheet as they had no further use for it).
I have the laser cutter poke two tiny holes, smaller than the wire and not quite all the way through, to ensure that the wire goes through in exactly the right place, while still forming a tight seal around the wire.
The “hooks” side of the velcro goes on the flap and holds the plug. It looks like it’s just a rounded corner rectangle (laser cut of course), but actually there are two matching holes for the wire to go through. Initially I had trouble finding them each time to get the wire through, but then I realized if you simply hold it up to the light, they stand out brightly.
The “loops” side of the velcro has a 3/8” (10mm) hole pre-cut for the grommet. These grommets always claim they are self-piercing, meaning you don’t have to pre-cut a hole in the fabric, but this is a lie. You have to pre-cut a hole if the grommet is going through anything thicker than a Kleenex.
Here is the grommet press I use to smash the two halves of the grommets together. We originally got it for putting grommets in quilts to stretch them on picture frames.
Update! In the original version of this blog post I glossed over one question: what to do about the air gap between the straw and the grommet hole while you are drinking. I wanted to find some kind of foam sleeve that would seal up around the straw. Eventually I figured out the source: pen grips. These are cheap and just the right size, when combined with the silicone sleeves the straws already come with.
Second update: the foam sleeve does provide an air-tight seal, but really this isn’t such a great idea. After actually using the mask for a while, the most effective way seems to be to open the flap just briefly while you’re drinking. It’s quick and easy to open and close it, so you can use the straw as you normally would, lifting it up and using it only while actually drinking. No need for an air-tight seal. So now I’m including only the silicone sleeve, which makes the straw more comfortable to drink through, and closes off most, but not 100%, of the grommet hole.
I promised you a discussion of stitch skipping, so here it is. Feel free to not read it if you’re not into sewing machine details.
Sewing machines are kind of insane. The key event is when the “hook” passes by the needle, catches the top thread, and then pulls it down, under, and entirely around the bobbin, forming a loop that is later pulled tight by the take-up lever at the top of the machine. In order to catch the top thread, which is pulled tight along the length of the needle, the hook has to “kiss the needle” as it passes by. Ideally it should just touch, but not really touch, the needle. Consistent alignment of well under 1/10mm between the needle and hook must be maintained for reliable stitching. This is why (non-crappy) sewing machines have a heavy cast iron or aluminum C-frame that keeps the needle post and bobbin assembly rigidly in line.
Alignment becomes an even bigger problem when you’re trying to do something fancy, like zig-zag stitching, where the needle is moving side to side. In nearly all sewing machines, the bobbin assembly, which contains the hook, rotates in a plane parallel to the movement of the needle in a zig-zag stitch. That means the needle will remain in the same plane, relative to the movement of the hook, as it goes from left to right. That’s good, because it means the hook will stay the right distance (zero) from the needle to pick up the thread each time. It’s bad, because the height around the circle at which the hook meets the needle will change based on how far to one side the needle is. This limits the width of zig-zag that is possible.
The unusual salesman-sample Ward Futura sewing machine I use for black thread takes a different path. In the previous picture we were looking from the front of the machine, so fabric would be traveling away from us. Here we’re looking from the side, and fabric travels right to left. The bobbin assembly and hook are rotating in a plane parallel to the direction the fabric is traveling, not the direction the needle is moving. It’s rotated 90 degrees from the way it works in normal machines.
This creates an immediate crisis: how can the needle move side to side (which is front-to-back when seen from this side view) to create a zig-zag stitch? This would put the needle wildly out of alignment with the hook!
The solution is, of course, that the entire bobbin assembly has to move too, following the position of the needle. From below we can see the sturdy mechanism that makes this happen (the connecting rod that travels from the bottom right to the center shaft behind the bobbin assembly bearing).
The precision required to make this work at all is admirable. Pushing on the bobbin assembly you can feel just a bit of slop in the mechanism, which I was all ready to blame for the missed stitch, until I traced down where the slop is. I found to my astonishment that when you push the bobbin assembly, the needle—way on the opposite side of the linkage but physically right next to the bobbin assembly—moves exactly in sync (we’re talking about a small fraction of a mm for both movements). In other words, the slop is only in the variable-width cam that causes the combination of both the needle rod and the bobbin case to move (which is an understandable and harmless place to have some slop). The linkage between the two parts that must remain aligned appears to be rock solid.
So probably the skipped stitch is just down to flex in the needle, due to the thick, stiff nature of the Velcro. Maybe I need to use a thicker needle.
I leave you with this picture of one lovingly over-engineered machine, which is working hard every day to add straw holes to plague masks.